How to use Saros Finance: A step-by-step guide

Saros Finance is one of the newest products on Solana, yet it is really potential. Therefore, learning about how to use Saros Finance is of great interest to community users. In this article, I’ll guide you on how to use Saros Finance with its features. Now, let’s get started!
Saros Finance Overview
Saros Finance is a DeFi Suite consisting of multiple products, namely SarosSwap (AMM), SarosFarm (Pool), and SarosStake (Stake), with SarosSwap being the core element. Saros Finance attempts to resolve the existing obstacles on Solana by providing various features.
Among the 3 products in the Saros ecosystem, there are SarosSwap and SarosFarm are available now. In the future, Saros Staking will be released. So keep updating with the lastest news!
Preparation for using SarosSwap
Download the Coin98 Super App
First, users need to download and create an account (optional) on the Coin98 Super App.
Coin98 Super App is available for download.
Read the detailed instruction on how to install Coin98 Super App or watch the tutorial video below:
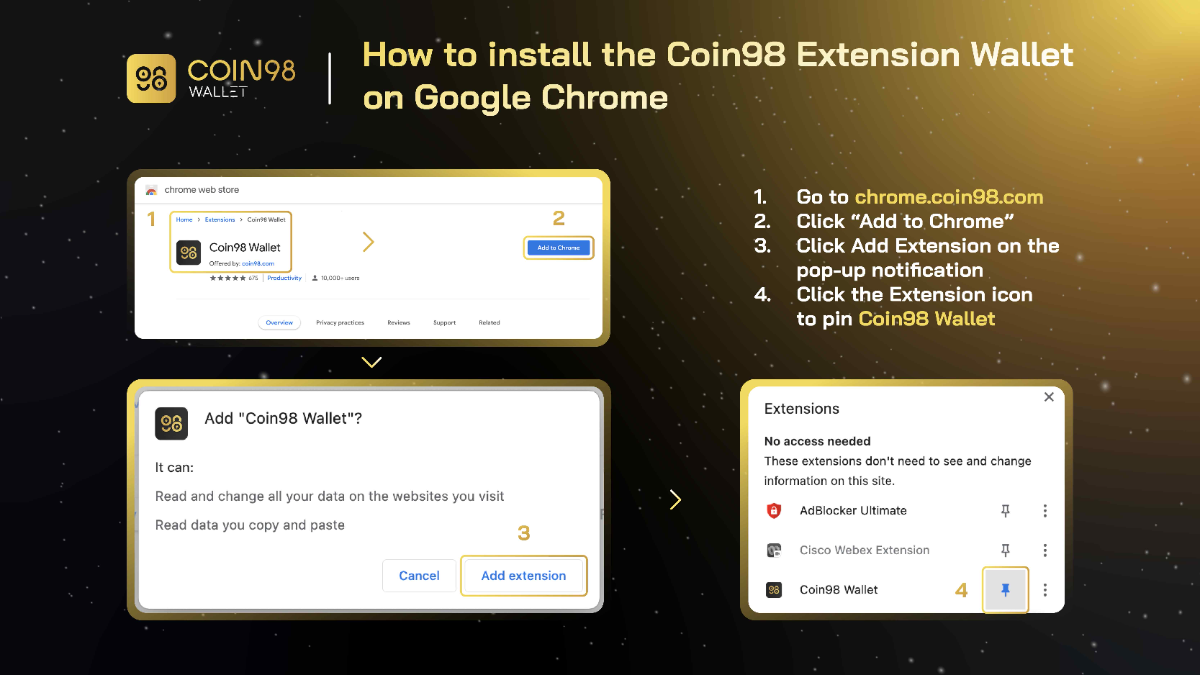
Install the Coin98 Extension Wallet
Follow these steps to install the Coin98 Extension on Chrome:
Step 1: Find and select Coin98 Extension on Chrome Web Store;
Step 2: Click Add to Chrome.
Step 3: A pop-up notification will be displayed on the screen, please read it carefully. To approve, click Add extension.
Step 4: To use the extension, click the extension icon to the right of the address bar. If the Coin98 Extension shows up in the drop-down menu, it has been installed and enabled successfully.

Create an Solana Wallet on Coin98
Before using SarosSwap, users need to create a Solana (SOL) wallet. Users can create a new Solana wallet on Coin98 or import an existing Solana wallet from other wallets to Coin98. Creating a Multi-chain wallet on Coin98 will also include a Solana sub-wallet.
Preparing SOL as gas fee
SarosSwap uses SOL for gas fees. Therefore, in order to trade on SarosSwap, users must have SOL in their wallets. Users can buy SOL on a centralized exchange such as Binance, FTX,... and send it to the Solana wallet address on Coin98.
How to use SarosSwap with the Coin98 Extension
Connect the Coin98 Extension to SarosSwap
Step 1: Go to the SarosSwap website here: https://saros.finance/swap
Step 2: Connect to the Coin98 Extension. Click “Connect Wallet”.

Step 3: Enter your Coin98 Extension password, then click “Connect”.

Swap
Step 1: Select the trading pair and enter the amount that you want to swap. Click “Swap”.

Step 2: Check all the details and click “Confirm”. Confirm one more time in your Coin98 Extension.

You have successfully swapped on SarosSwap.
How to use Saros on Coin98 Super App
Swap natively with Saros Swap
Step 1: Open the Coin98 app, select Swap.
Step 2: Select the icon on the top left corner, select Saros Swap.
Step 3: Select the SOL wallet address you want to make the transaction.
Step 4: Select the tokens/coins you want to perform Swap. Enter the corresponding trading volume. Here, I will choose Swap USDC and C98.
Step 5: Select the settings icon in the top right corner of the screen and choose between 2 interface options: Basic UI (1) and Pro UI (2).
Step 6: The screen will display the last information for you to confirm, in which note the number of swap assets, the number of assets received, and parameters such as:
- Rate: The ratio of the price between the pair of tokens that you want to swap.
- Price Impact: The difference between the market price and the estimated price provided by SarosSwap.
- Estimate gas fee: SOL number used as transaction fee.
After checking everything carefully, you click Swap.
The system will display a pop-up for you to check the command again. If you agree to swap, choose Swap to complete.
Note: You can adjust gas and slippage according to your needs by clicking on the icon in the upper right corner of the screen.
- Gas fees on Coin98 have been optimized for users to make quick transactions with the most reasonable cost.
- Slippage is one of the common causes of swap failures. You can trade with the default slippage on SarosSwap (0.5%), or customize it higher to ensure the highest success rate.
- The arrow in the middle has the function of changing buy and sell positions, you need to pay attention to check carefully to not place the wrong order.
After the Swap is successful, you can return to the main screen to check the traded tokens or check right at Trade History in the trading interface.
Add liquidity
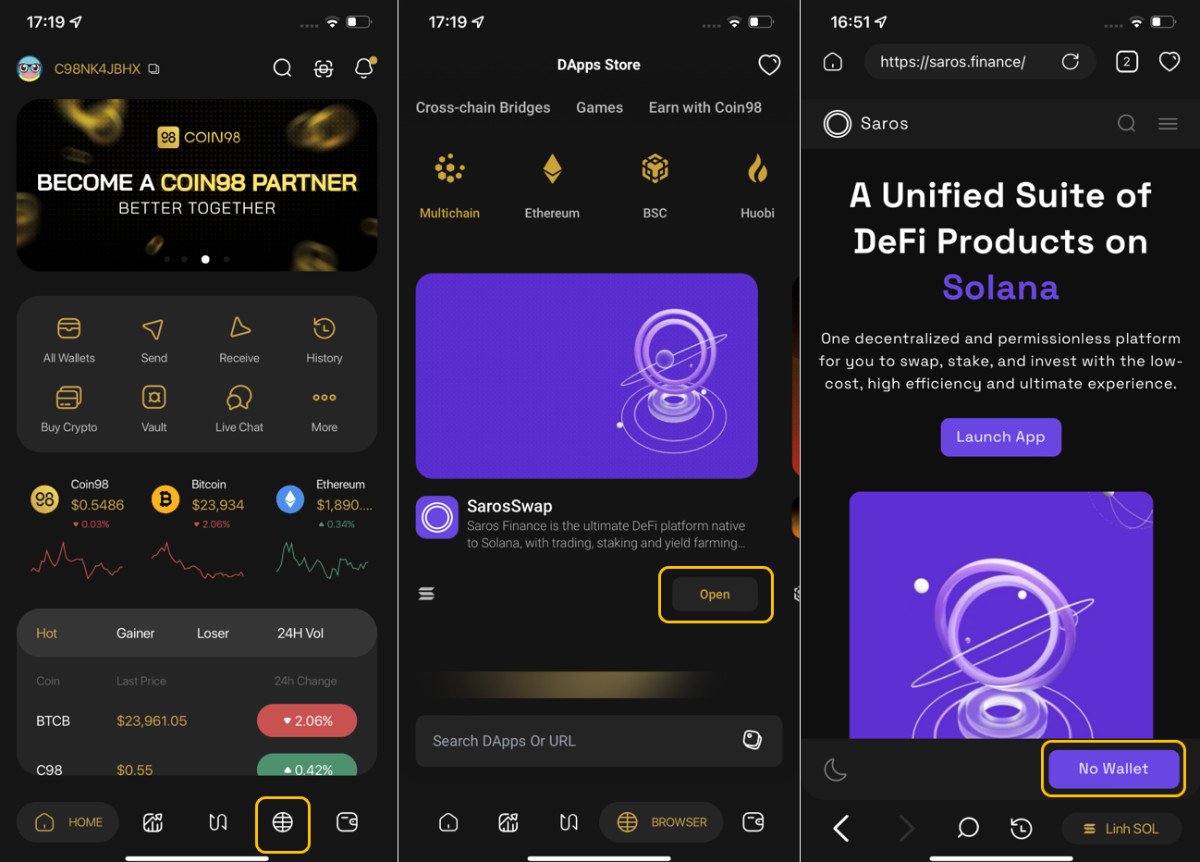
Step 1: Open Coin98 app, select Dapp Browser icon.
Step 2: Select Saros.
Step 3: Select No Wallet, Coin98 will automatically connect to the corresponding Solana Wallet.

Step 4: Click on the top right corner icon, select Liquidity
Step 5: Select Add Liquidity.
Step 6: Select the tokens pair you would like to Add liquidity.
Step 7: Click Supply.
Step 8: Check the information again, if they are correct, select Supply. There will be a pop up window from Coin98 to request your signature. Click Sign.
Step 9: The transaction is completed and you can see Your Liquidity.
Remove liquidity on Saros
Step 1: After accessing Saros Finance and logging in the Coin98 Wallet, click the Connect Wallet icon in the upper right to connect to Coin98. Saros Finance will automatically detect and connect to your Coin98 wallet.
Step 2: Click on Liquidity in the left corner, you will see your Liquidity. Click on the arrow to show the details of your added liquidity. Click Remove
Step 3: Enter the amount of liquidity you want to remove. Click Remove.
Step 4: Check the amount you will receive, then click Confirm Remove.
Step 5: There will be a pop up window from Coin98 Wallet Extension to request your signature. Click Sign
Step 6: After removing successfully, you can check the liquidity in your wallet.


