What is MetaMask? How to use MetaMask Wallet for beginners

What is MetaMask?
MetaMask is a Crypto wallet that allows users to interact with the blockchain in a simple way. In real life, you need a wallet to keep your money, which will be used to buy various things like goods, items, assets...
Similarly, on a blockchain, you need a wallet like MetaMask to store your cryptocurrencies, which may be used in numerous decentralized applications such as DeFi, NFT, GameFi...

MetaMask Review
2021 has been an excellent year for MetaMask, with its number of active users rising dramatically. MetaMask had over 10 million Monthly Active Users in July 2021, and this number has increased to over 21 million in April 2022, as reported by MetaMask.

At the same time, MetaMask has had one of the highest cumulative revenues among Crypto dApps (decentralized applications), ranking at #6 with $166.3M.

Advantages of MetaMask
- Popular: MetaMask is one of if not the most well-known crypto wallets at the moment.
- Easy to use: Users can easily interact with the blockchain by using MetaMask as it has a user-friendly interface.
- Integrated: MetaMask has integrated with over 4,000 dApps. You can easily use any Crypto application with MetaMask.
Disadvantages of MetaMask
- Security: MetaMask is a hot wallet, meaning it is connected to the Internet. As a result, it is more vulnerable to hacks and security breaches compared to cold wallets.
- Compatibility: On desktop, MetaMask operates as a browser extension instead of an independent application. This causes MetaMask to become laggy and stop working sometimes.
How to download MetaMask and create a Wallet
MetaMask is currently available on multiple desktop browsers as well as mobile devices. Before you can create a MetaMask Wallet, you must first download MetaMask to either your browser or your mobile phone.
MetaMask Extension
You can add MetaMask as an extension to your browser(s).
In this article, I will install MetaMask on Chrome as an example. For other browsers, the process is almost identical, so you don’t have to be worried.
First, enter the link above, and you will see the interface below. Click on “Add to Chrome”.
Proceed with “Add extension”.

Now that you have downloaded MetaMask to your browser extension, you will be able to see and open MetaMask by clicking on the extension logo in the top right corner, as pointed out in the picture below.
As you have just installed MetaMask, it will be automatically opened for you to set up. Click on “Get Started” to continue.

Here you will have 2 options to select: Import Wallet or Create a Wallet.
- If you have had a MetaMask Wallet before, you can import it to the current MetaMask browser’s extension by using a Secret Recovery Phrase (a 12-word passphrase).
- Or, you can create a completely new one, which I will be doing in this walkthrough. Choose “Create a Wallet”.
You will be required to create your MetaMask password, which will be needed each time you want to log in MetaMask on this browser.
After entering your password with at least 8 characters, tick the checkbox of “I have read and agree to the Terms of Use” and click on “Create”.

IMPORTANT: Remember that this password is different from your 12-word passphrase/Secret Recovery Phrase/Private Key.
It only allows you to get access to MetaMask on this browser, not a specific wallet within that may store your assets. Other people may get control of your assets if they have your Wallet’s Private Key, not your MetaMask password (unless they also have control of your computer).
MetaMask will now introduce you to the concept of Secret Recovery Phrase. Click on “Next”.

The last step before creating a MetaMask Wallet is to generate the Wallet’s Secret Recovery Phrase, also known as the Private Key. MetaMask will do that work for you, so you just have to remember this phrase and/or store it somewhere safe.
- Save in a password manager.
- Store in a bank vault.
- Store in a safe deposit box.
- Write down and store in multiple secret places.
IMPORTANT: Again, it is really imperative that you keep this 12-word phrase available to you and only you. It is the only proof on blockchain that can verify your Wallet is truly yours. “Not your keys, not your coins”.
Click on the censored text box to view your Secret Recovery Phrase. After storing your Private Key in a secure way, you may proceed to create your Wallet by clicking on “Next”.

MetaMask will then require you to enter your corresponding Secret Recovery Phrase in order to ensure that you have remembered and/or kept them in other places. Select the words in the correct order, and then click on “Confirm”.

You have now successfully created a MetaMask Wallet. Click on “All Done” to finish your setup.

MetaMask App
MetaMask is also available on Android and iOS.
Here I’ll use an iOS device as an example.
Step 1: Click on “Get” to install MetaMask.
Step 2: After you finish your download, open MetaMask and click on “Get started”.
Step 3: Here you will have 2 options to select: Import Wallet or Create a Wallet. If you have had a MetaMask Wallet before, you can import it to the current MetaMask browser’s extension by using a Secret Recovery Phrase (a 12-word passphrase). Or, you can create a completely new one, which I will be doing in this walkthrough. Choose “Create a Wallet”.
Step 4: Continue by selecting “I Agree”.

Step 5: You will be required to create your MetaMask password, which will be needed each time you want to log in MetaMask on this browser. After entering your password with at least 8 characters, tick the checkbox of “I have read and agree to the Terms of Use” and click on “Create”.
Step 6: Continue by clicking on “Start”.
Step 7: MetaMask will now provide you with some tips on securing your Wallet’s Secret Recovery Phrase, before generating it. Click on “Start”.
Step 8: Click on “View” to reveal the Secret Recovery Phrase.

Step 9: Save/write down this phrase and then choose “Continue”.
Step 10: MetaMask will then require you to enter your corresponding Secret Recovery Phrase in order to ensure that you have remembered and/or kept them in other places. Select the words in the correct order, and then click on “Complete Backup”.
Step 11: You have now successfully created a MetaMask Wallet. Click on “Done” to finish your setup.

How to use MetaMask Wallet
With MetaMask, you can perform a variety of functions and features. In the next part, I will guide you through some of the most used features of MetaMask, as well as how to use them.
How to receive tokens to MetaMask
Adding cryptocurrencies to your Wallet is one of the first things that you should/have to do. For example, if you want to use the Ethereum blockchain, you will need to possess ETH (Ethereum native coin) tokens as gas fees. Hence, adding ETH to your wallet is the first and foremost step.
In this article, I will use ETH as an exemplary token. You can receive ETH tokens by sending them through another Wallet - which may be custodial Wallets (from CEXs like Binance, FTX...) or non-custodial ones (like Coin98 Wallet).
IMPORTANT: Before sending or receiving tokens, make sure that the transaction is conducted on the same network as both the sender and the receiver. For example, if you want to receive ETH on the Ethereum Mainnet, the sender will also have to send ETH through the Ethereum Mainnet. One Wallet address can be available on multiple networks, so it can be easily mistaken and will possibly lead to loss of funds.
First of all, you have to open your MetaMask by clicking on the Extension icon in the top right corner, and then choosing MetaMask.

The MetaMask interface will be shown as in the below picture. You can also open MetaMask to a separate tab instead of a browser extension by clicking on the Menu icon and then selecting “Expand view”.

To receive tokens to your Wallet, simply get the Public Address of your Wallet. This can be done by clicking on the Text Box in the middle that includes the Public Address (usually in the format of 0x…). It will be automatically copied to the clipboard.
You can now send crypto tokens to this address. After the transaction is confirmed, the tokens will appear in your Wallet.
How to add tokens to MetaMask
There exists myriads of tokens on the Ethereum Mainnet. However, initially on MetaMask, only ETH is shown. If you transfer other ERC-20 tokens to the MetaMask Wallet, they may not be shown as well.
The reason behind this is you haven’t added the corresponding tokens to MetaMask. Here’s how.
First of all, open MetaMask and click on “Import Tokens”.

You can search the token directly by entering the token’s ticker into the Text Box. If the token is not shown there, change to “Custom Token” to add the token manually.
Here you can add the token to your MetaMask Wallet manually by entering its Token Contract Address. This can be found using Coingecko or CoinMarketCap, or provided directly by the project in its website or documentation.
I’ll take Uniswap (UNI) as an example. After I enter its Token Contract Address, MetaMask will autofill the other 2 sectors, which are Token Symbol (UNI) and Token Decimal (18 by default). Most of the time, you should keep these 2 by default as the information has already been added automatically and correctly.
Afterwards, MetaMask will ask you to confirm whether the token you are adding is correct. If it is, click on “Import Tokens” and you will successfully add that token to your MetaMask Wallet.
How to withdraw tokens from MetaMask
Now that you know how to receive tokens, you will also need to know how to withdraw/send them. First, click on “Send”.

Enter the receiver address along with the number of tokens you want to send. Afterwards, click on “Next”.

Here there will be 2 choices for you: Either you can accept the number of gas fees that MetaMask estimated for you (for basic users) or you can manually edit it (for advanced users).
If you want to simply finish your transaction, go with the first option by clicking on “Confirm”. Here I’ll go for the more advanced option by clicking on “Edit”.

MetaMask will now show you 3 levels of priority, which will be explained as follows:
- High: This is best for time-sensitive transactions (like Swaps) as it increases the likelihood of a successful transaction. If a Swap takes too long to process it may fail and result in losing some of your gas fees.
- Medium: A medium gas fee is good for sending, withdrawing, or other non-time-sensitive transactions. This setting will most often result in a successful transaction.
- Low: A lower gas fee should only be used when processing time is less important. Lower fees make it hard to predict when (or if) your transaction will be successful.
If you want to set the gas fees to a specific number, click on “Advanced Options”.

Here there are 3 very specific numbers for you to choose from:
- Gas Limit: The gas limit is the maximum number of units of gas you are willing to pay in order to carry out a transaction or EVM operation. 21,000 is the standard number.
- Max priority fee: The max priority fee is referred to as the "miner tip" which incentivizes miners/validators to prioritize your transaction. Most often, the value you put in for "max priority fee" will be the amount you pay.
- Max fee: The max fee is the total, global amount paid for your transaction. It is calculated as: (Base fee + Priority fee) * Units of gas used.
When you are done customizing these options, click on “Save” and then choose “Confirm” on the next page.

How to swap tokens on MetaMask
MetaMask has recently integrated the “Swap” feature directly into its interface, allowing users to utilize it as a DEX Aggregator. At the moment, this feature is only available on Ethereum.
To use this feature, open MetaMask and click on “Swap”.
Next, choose the trading token pair as you wish. Here I’ll take ETH and DAI as an example. You can click on “Advanced Options” to change the Slippage Tolerance. Afterwards, choose “Review Swap”.
MetaMask will then give you the most optimal trading option. You can click on “Edit” to change the gas fee, or click on “Swap” to execute your trade. Remember that MetaMask charges you a 0.875% fee for every trade you make.
How to import other Wallets to MetaMask
You can also import other Wallets to MetaMask with their Public Keys. Open MetaMask and click on the Circle Icon in the top right corner.

Select “Import Account”.

Here you will have 2 options: Private Key and JSON File. Private Key is the more popular type, so I would use this one.

Enter your Private Key, then proceed by clicking on “Import”.

How to import NFT to MetaMask
At the moment, MetaMask only supports adding NFTs as custom tokens in the extension rather than showing them natively in the UI. The process of importing NFT to MetaMask includes receiving the NFT and adding them as custom tokens so that they can show up in your Wallet.
For clearer instructions, please refer to the 2 section “How to receive tokens to MetaMask” and “How to add tokens to MetaMask” above.
How to get MetaMask API
You can check out MetaMask’s API Reference here.
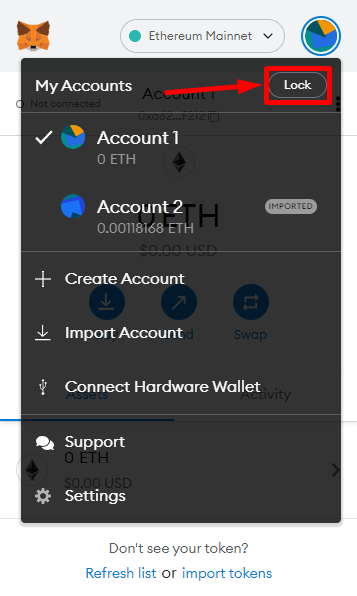
How to lock and unlock MetaMask Wallet
If you want to lock your MetaMask Wallet, open MetaMask. Click on the Circle Icon in the top right corner and select “Lock”.
To unlock MetaMask, simply open it and log in by clicking on “Unlock” after entering your MetaMask password.

How to change MetaMask password
In order to change your MetaMask password, first, you have to restart MetaMask. This can be done by restarting your browser, or clicking on the Circle Icon in the top right corner and selecting “Lock”.
You will now be requested to log in MetaMask again. This time, choose “Forgot password”.

The Secret Recovery Phrase is now needed if you want to change your password. After entering your Secret Recovery Phrase, you can type in your new password and click on “Restore”.

How to connect MetaMask to dApp Browser
You can connect MetaMask to the majority of dApps. I will take Uniswap as an example in this walkthrough. First, open the dApp website, and click on “Connect Wallet” in the top right corner. Some dApps will automatically do this for you when you open their website.

A list of supported Wallets will show up. Choose MetaMask.

If you have multiple accounts in your MetaMask Wallet, you can tick the checkbox of the respective account(s) that you want to connect. Proceed by clicking on “Next”.

Select “Connect”. Your MetaMask Wallet is now connected to the dApp.

How to disconnect MetaMask from dApp Browser
First, open MetaMask and click on “Connected” in the top left corner.

Choose the account that you want to disconnect. Click on the Menu Icon on its right side, and select “Disconnect this account”.
MetaMask Alternatives: How MetaMask compares to other wallets
MetaMask vs Coinbase Wallet
While MetaMask was released in 2016, Coinbase Wallet was available in 2018, which has made it one of the biggest competitors of MetaMask.
Even though they share a few similarities like being hot and non-custodial Wallets, supporting both desktop and mobile... there are a number of differences between the two Wallets as:

MetaMask vs Trust Wallet
Trust Wallet is also another top-rated crypto Wallet at the moment. What are the differences between MetaMask and Trust Wallet? The table below should give you a clearer idea.

Some MetaMask security tips you must know
To keep your MetaMask Wallet secure, here are some small but must-know tips:
- Don’t share your MetaMask Wallet with anyone, even your closest people. That will leverage the risk of losing access to your Wallet.
- Be careful when you share your computers/mobile phones containing your MetaMask Wallet with others.
- If you use MetaMask on Mobile phones, remember to quickly lock/deactivate them in case of losing/being stolen.
- Back up your Secret Recovery Phase securely. It is advisable to write them somewhere down offline rather than online, as online data are always vulnerable to hacks or simply loss.
- If you have a cold Wallet like Ledger, you should connect it to MetaMask in order to boost the security of your Wallet.
- You can create multiple accounts within a single MetaMask Wallet to split your funds. If somehow you lose access to one account, it will cost only a much smaller amount.
Also available in
Vie